

October 25, 2010
Ghouls in the Garden
We got to give the Halloween costumes a test run at Ghouls in the Garden. My sister made a really cool R2-D2 costume out of a trash can... its ***amazing***. His big sister was a very sweet looking Raggedy Ann. My boys went as Darth Vader and Yoda (light sabers are dangerous in crowds)
October 23, 2010
looking for the good
It's been a rough month. Honestly, I don't really care much for the month of October. I associate it with too much that's negative. Then there's the weather, which can be beautiful but too often its a glimpse in to winter (which I also don't care for). I've been feeling down and my funk must be wearing off on the boys. I need to reset, re-evaluate, and remind myself of the things I'm thankful for and the wonderful things that surround me. The things I enjoy are easy to find when I look. I see them daily; I just don't always see them. Every day, at my kitchen sink, I get an eyeful of good, things I enjoy, things that I am thankful for...

My "new" chair. It was free - somebody kicked it to the curb. After a thorough cleaning it's sitting in a temporary location waiting for some refinishing on the wood legs. Phil does not like this chair but I love this chair. I do. It's sturdy and the kids like to pile in it and watch me work on projects. I also love coffee. Every day. Love.

 And the man that made those kids possible, my husband. He is good. I love him. Every day. He is sturdy and he is a master at pulling me out of my funks. Most definitely thankful for him - hey October is seeming better already. :)
e
My "new" chair. It was free - somebody kicked it to the curb. After a thorough cleaning it's sitting in a temporary location waiting for some refinishing on the wood legs. Phil does not like this chair but I love this chair. I do. It's sturdy and the kids like to pile in it and watch me work on projects. I also love coffee. Every day. Love.
And of course my kids. I love them, I'm thankful for them, I need them. They are crazy little people with a ton of energy and even though I maybe, might have, once or twice, possibly threatened to trade them in, I wouldn't trade them for the world. Those little moments. I'm thankful to be so blessed. That's good.
There are definitely days (or hours) that are easier than others...
e
October 20, 2010
our spooky halloween tree | DIY project
Every store. Every single store. They all have Halloween displays. My kids have to explore every single one. This adds an average of 35 minutes on to any errand we run. I don't mind them looking at the displays so much as the non-stop begging and insisting that we NEED to have these spooky decorations. I decided we could make our own at home for less money since they didn't like my idea of buying some decorations when they went on clearance after Halloween. These kids are way too hung up on the whole instant gratification thing.
So I went digging in the backyard for an old cast iron planter I knew had been relegated to an out of sight, out of mind corner of the yard. It was not aging well. Apparently neglect causes rust. Then the kids and I set out on a hunt of the neighborhood for that just-right fallen tree branch. After a lot of walking and finding nothing we came home, looked up, and voila! Dead tree branches right there above us in the tree. I tried to pretend the neighbors didn't notice me jumping up and down repeatedly trying to grab the branches to pull them down. It only took 5 tries to get two branches, I'm sure nobody saw me. Even the ones standing in their doorways looking our way with odd looks on their faces. Carry on. Just carry on. We stuck the branches in the planter - which looked way better with the unknown dead plant removed and a new coat of black spray paint. Then we spray painted the branches with the same black spray paint. Another coat of spray paint - but this time with silver glitter. My front yard has a nice glittery glow to it when the sunlight hits it - bonus.
 After nap when everything was dry we strung some orange string lights on the tree and placed it in the front flower bed. The dead tree branches matched well with the dying plants and bushes in there. Made me think I could have saved myself all the jumping for tree branches and spray painting trouble and just hung the lights on the dying bushes. The boys think its really cool, and spooky.
  We'll call this a success even though I'm not all that impressed with it. My kids impressed = success. All my husband had to say when he came home and saw it in the front yard was 'That thing is not going in the house'. I guess he wasn't all that impressed either. The sun had just about set when he got home so he didn't get to see the pretty, glittery lawn. I'll let that be a surprise for him for another day :)
So total cost for two cans of spray paint and a string of lights = under $10. Probably more than something similar would have cost us at post Halloween clearance sales. ::sigh::
e
So I went digging in the backyard for an old cast iron planter I knew had been relegated to an out of sight, out of mind corner of the yard. It was not aging well. Apparently neglect causes rust. Then the kids and I set out on a hunt of the neighborhood for that just-right fallen tree branch. After a lot of walking and finding nothing we came home, looked up, and voila! Dead tree branches right there above us in the tree. I tried to pretend the neighbors didn't notice me jumping up and down repeatedly trying to grab the branches to pull them down. It only took 5 tries to get two branches, I'm sure nobody saw me. Even the ones standing in their doorways looking our way with odd looks on their faces. Carry on. Just carry on. We stuck the branches in the planter - which looked way better with the unknown dead plant removed and a new coat of black spray paint. Then we spray painted the branches with the same black spray paint. Another coat of spray paint - but this time with silver glitter. My front yard has a nice glittery glow to it when the sunlight hits it - bonus.
We'll call this a success even though I'm not all that impressed with it. My kids impressed = success. All my husband had to say when he came home and saw it in the front yard was 'That thing is not going in the house'. I guess he wasn't all that impressed either. The sun had just about set when he got home so he didn't get to see the pretty, glittery lawn. I'll let that be a surprise for him for another day :)So total cost for two cans of spray paint and a string of lights = under $10. Probably more than something similar would have cost us at post Halloween clearance sales. ::sigh::
e
October 15, 2010
Book Shelves for Under $20 | DIY Project
I've been working on the boys room for a while now (baby steps, I tell my husband). Actually I guess I've been working on it for over 5 years since we never did decorate the baby room beyond a coat of 'we don't know the baby's gender' light green paint. They are big boys now and like things more along the lines of legos and star wars so I'm trying to give them that. Well, in a subtler, cooler kind of way then their proposed Star Wars stickers all over the walls suggestion. We've painted the wall a cool silver/gray color.
We have a ton of kids books. They've overflowed from the little book bin in their room and on to the adult bookshelves and almost every other surface in the house so I really wanted a way to get some of those books in their room. I looked around for just where to put this shelf for books (having two concrete walls in their room makes hanging things hard) and then I saw it... that too often overlooked, underused, empty wall. behind the door...

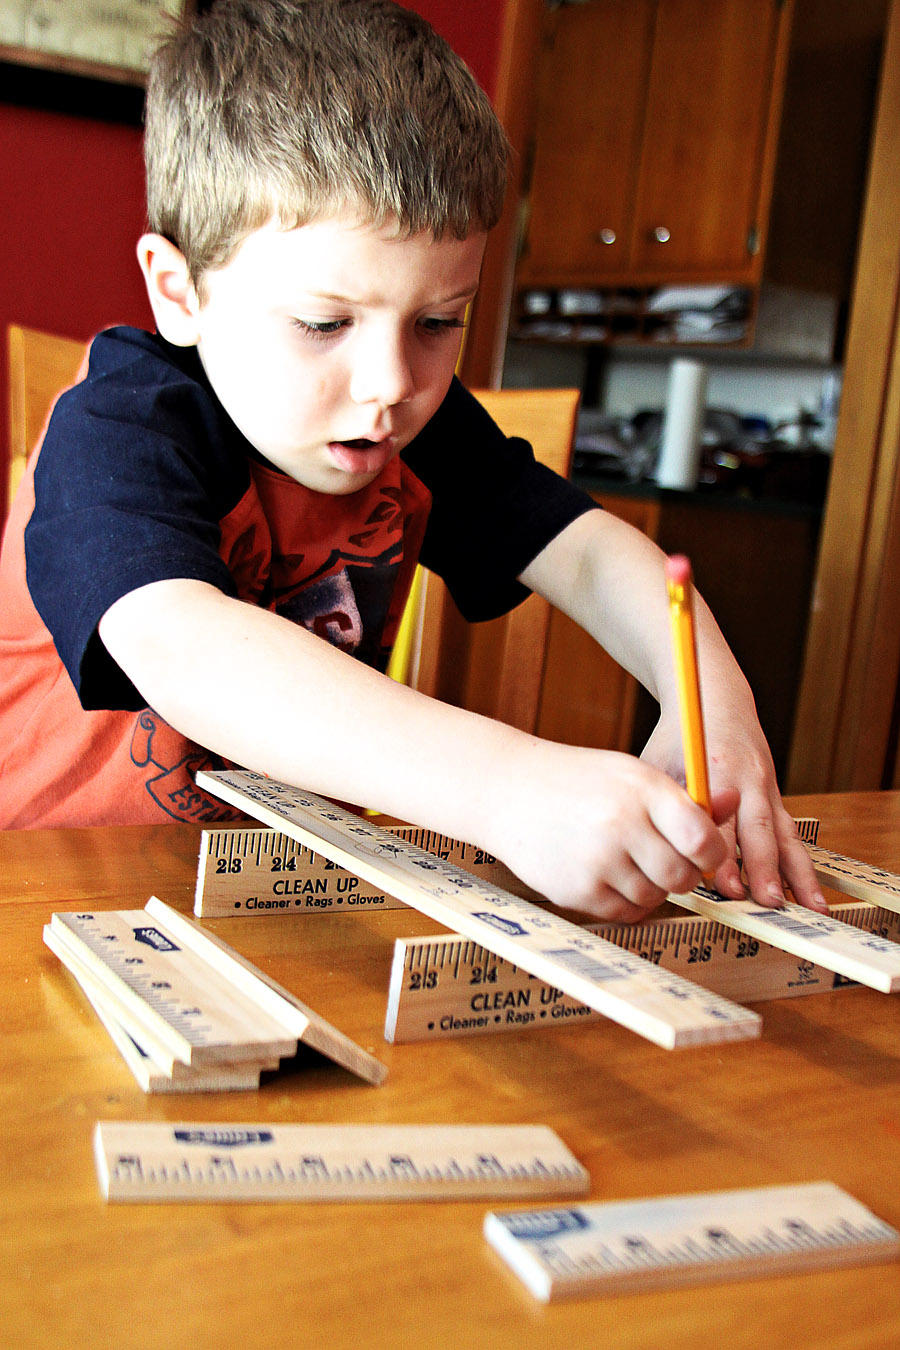
I pulled out the measuring tape and determined I had about a 3 inch deep by 18 inch wide by 6+ foot area of unused wall space and immediately decided a book rack would fill it in nicely. Off to the hardware store with the boys (always a fun time) to pick up the supplies. I had intended on getting thin wood dowels as the supports to hold the books in but then I saw the pine yard sticks in the paint section. They were cheap (90 cents) and the blue type fit the room's color scheme...

I laid out my boards like a ladder. Measuring and marking as I went. I put a 15 1/2" wide board as a shelf every 12 inches. Then I decided I wanted a couple of shelves to be an inch larger... re-measured, re-marked. Once I had the markings all set I laid it out in the garage and prepared to use the hubby's nail gun (sweet!). Wood glue first, place shelves using pencil markings as guides and speed square to keep everything neat, then NAIL.

Once you have the 'ladder' all glued and nailed together you're ready to put on the rails. I cut the yardsticks to the same width as the whole book rack. I decided to use the middle portion so we wouldn't have the Lowe's logo on them (or the barcode)... Can't believe I got permission to use the saw. Can't believe I didn't lose any fingers.

Use wood glue to attach to the rack. Then nail or clamp in place to hold until the glue dries. I placed my yardstick rails about 2 inches above the shelf. I did not add lips to the shelves but it would probably be a good idea to do so. The 1/2" x 2" boards cut to width of the rack would work well.

The scraps from the yardsticks will provide hours of entertainment for the kids...


Last step was to ask the husband to hang the shelves. I am not qualified to do this. My husband is ok with the book rack being a little wonky but he would not be ok with me wonking up the walls....

Fill with books. Rearrange several times. Try arranging by color. then by author. then decide your kids are going to mix it all up anyway and put their favorites on the lower shelves that they can reach. Step back and admire.


So under $20 and 2 hours of time (with little kiddos interrupting) makes me one happy mama with the results!
e


We have a ton of kids books. They've overflowed from the little book bin in their room and on to the adult bookshelves and almost every other surface in the house so I really wanted a way to get some of those books in their room. I looked around for just where to put this shelf for books (having two concrete walls in their room makes hanging things hard) and then I saw it... that too often overlooked, underused, empty wall. behind the door...
I pulled out the measuring tape and determined I had about a 3 inch deep by 18 inch wide by 6+ foot area of unused wall space and immediately decided a book rack would fill it in nicely. Off to the hardware store with the boys (always a fun time) to pick up the supplies. I had intended on getting thin wood dowels as the supports to hold the books in but then I saw the pine yard sticks in the paint section. They were cheap (90 cents) and the blue type fit the room's color scheme...
I laid out my boards like a ladder. Measuring and marking as I went. I put a 15 1/2" wide board as a shelf every 12 inches. Then I decided I wanted a couple of shelves to be an inch larger... re-measured, re-marked. Once I had the markings all set I laid it out in the garage and prepared to use the hubby's nail gun (sweet!). Wood glue first, place shelves using pencil markings as guides and speed square to keep everything neat, then NAIL.
Once you have the 'ladder' all glued and nailed together you're ready to put on the rails. I cut the yardsticks to the same width as the whole book rack. I decided to use the middle portion so we wouldn't have the Lowe's logo on them (or the barcode)... Can't believe I got permission to use the saw. Can't believe I didn't lose any fingers.

Use wood glue to attach to the rack. Then nail or clamp in place to hold until the glue dries. I placed my yardstick rails about 2 inches above the shelf. I did not add lips to the shelves but it would probably be a good idea to do so. The 1/2" x 2" boards cut to width of the rack would work well.

The scraps from the yardsticks will provide hours of entertainment for the kids...
Last step was to ask the husband to hang the shelves. I am not qualified to do this. My husband is ok with the book rack being a little wonky but he would not be ok with me wonking up the walls....

Fill with books. Rearrange several times. Try arranging by color. then by author. then decide your kids are going to mix it all up anyway and put their favorites on the lower shelves that they can reach. Step back and admire.

So under $20 and 2 hours of time (with little kiddos interrupting) makes me one happy mama with the results!
e
October 11, 2010
10 great things about 2011 seniors | st. louis senior photography
Meet Claire and Emily, two high school seniors who agreed to meet me in one of the, uh, dirtier parts of our city for a senior photo shoot. These girls were very cool. Want to know why they're so cool?
1. They will climb high and without fear for the shot...

2. They will go out on a limb for you...

3. They can laugh in the vicinity of stench (like poop stank. really.)...

4. They find the best props...


5. They sure can strike a pose...

6. Rusty nails, no problem...

7. They're able to find the color hidden among the dingy...

8. They like to share the spotlight....

9. They know good art when they see it...and still seemed to be friends by the end of the shoot...

And finally reason 10 for their coolness... these are just the out takes from the mornings shoot. You should see the rest of the pics!
It was great meeting you both - you girls are a lot of fun. Thank you for your fortitude and willingness to just go with the flow... I will have more pictures for you soon!
e
1. They will climb high and without fear for the shot...
2. They will go out on a limb for you...
3. They can laugh in the vicinity of stench (like poop stank. really.)...

4. They find the best props...

5. They sure can strike a pose...

6. Rusty nails, no problem...

7. They're able to find the color hidden among the dingy...

8. They like to share the spotlight....

9. They know good art when they see it...and still seemed to be friends by the end of the shoot...

And finally reason 10 for their coolness... these are just the out takes from the mornings shoot. You should see the rest of the pics!
It was great meeting you both - you girls are a lot of fun. Thank you for your fortitude and willingness to just go with the flow... I will have more pictures for you soon!
e
October 10, 2010
Kaleb and Kinsley Sneak Peek | St. Louis Family Photography
Here's a family I was really excited to do photos for. I've seen them go from dating to family of four and boy do they make cute kids! Little sister Kinsley is Miss Independent at 1 1/2 years old. Look at those big brown eyes!

And big brother Kaleb... This guy is really cool. Protective of his little sister like a big brother should be and so sweet. He's the same age as my oldest and sometimes when they play together I can almost picture them 10 years from now as teenagers.

And the whole family. Family of four. You guys have come a long way and you've done it well. Your family is beautiful and so much fun!
October 5, 2010
old shirt, new shirt. small shirt, big shirt
Yes, we are Dr. Seuss fans in this house. One of my favorite Christmas gifts the year our second was born was a Thing 1 shirt and Thing 2 onesie. They never really fit both the boys at the same time. Now they have both definitely outgrown them.
I submit the following photos as evidence:


Have I mentioned I love these shirts? I do. But while I'm perfectly okay with sending my kids outside half naked to play in the backyard I just couldn't possibly take them out in public wearing these (we are still at the stage where they have to hold my hand - can't deny knowing them while holding hands).
Good thing I know where to get $2 shirts (Michaels). All I needed was a couple red shirts, some sharp scissors, and some no-sew iron on adhesive stuff:

I very carefully cut out the circles from the old shirts. Phil sort of mocked my idea of cutting these out and making new shirts so I couldn't afford to make a mistake and let him be right. I even managed to take a picture of myself while cutting the circles out with no mess ups. I rock.

Then I followed the directions on the package to iron the paper onto the old shirt cutouts and then iron onto the new shirts:

While I had the iron out (it's been over a year since I've ironed. really.) I decided to iron on a pirate transfer to another $2 shirt... the other iron on transfer says 'yo ho ho and a bottle of rum' with a baby bottle picture on it. My guys are a little too old for baby bottles so I'm saving that one for another project.

It goes great with the pirate gear

Thing 1 really digs his new shirt:

Thing 2 not so much.

I think he's just bitter that he's not number one or maybe he preferred the skin tight onesie. Probably the pout has more to do with the fact that he just woke up from nap and couldn't be bothered with posing for pictures.
I submit the following photos as evidence:
Have I mentioned I love these shirts? I do. But while I'm perfectly okay with sending my kids outside half naked to play in the backyard I just couldn't possibly take them out in public wearing these (we are still at the stage where they have to hold my hand - can't deny knowing them while holding hands).
Good thing I know where to get $2 shirts (Michaels). All I needed was a couple red shirts, some sharp scissors, and some no-sew iron on adhesive stuff:
I very carefully cut out the circles from the old shirts. Phil sort of mocked my idea of cutting these out and making new shirts so I couldn't afford to make a mistake and let him be right. I even managed to take a picture of myself while cutting the circles out with no mess ups. I rock.
Then I followed the directions on the package to iron the paper onto the old shirt cutouts and then iron onto the new shirts:
While I had the iron out (it's been over a year since I've ironed. really.) I decided to iron on a pirate transfer to another $2 shirt... the other iron on transfer says 'yo ho ho and a bottle of rum' with a baby bottle picture on it. My guys are a little too old for baby bottles so I'm saving that one for another project.
It goes great with the pirate gear
Thing 1 really digs his new shirt:
Thing 2 not so much.
I think he's just bitter that he's not number one or maybe he preferred the skin tight onesie. Probably the pout has more to do with the fact that he just woke up from nap and couldn't be bothered with posing for pictures.
October 4, 2010
Grace and Owen Sneak Peek | St. Louis Family Photographer
Yesterday I had the pleasure of photographing these two siblings. Their mom and dad went for a walk and I got to spend some time alone with them. Grace is smart and funny and will definitely be an athlete of some sort... or in the entertainment industry. And man can she climb a tree! Owen is a 3 year old that actually listened to me - enough said? Nope, he's also a charmer and totally dug my jokes - I like these kids. I really hope that my kids are this well behaved when they're not with me.
 Dara, I know you didn't intend on being in the pictures but really you're a beautiful mom. The ones with you in them are some of my favorite pics of your kids.


Thanks guys! I enjoyed the time with your kids and catching up


Thanks guys! I enjoyed the time with your kids and catching up
Subscribe to:
Posts (Atom)